After 16 months of hard work, FakeTag, which is a Chrome extension that allows you to use your bookmark folders as tags, is finally out!
For more information, please read FakeTag User Guide.
After 16 months of hard work, FakeTag, which is a Chrome extension that allows you to use your bookmark folders as tags, is finally out!
For more information, please read FakeTag User Guide.
This chapter describes the options page of FakeTag.
Click the "puzzle piece" icon on the toolbar to display a list of installed extensions, and click the "⋮" icon to display a menu for performing operations related to FakeTag. If you have the "![]() " icon placed on the toolbar, right-clicking on it will display the same menu. Then, select "Options" from the menu to open the options page.
" icon placed on the toolbar, right-clicking on it will display the same menu. Then, select "Options" from the menu to open the options page.

Open the extension management page (chrome://extensions) and click the "Details" button in the "FakeTag" section to display the details page. Then click "Extension options" to open the options page.
Select a category from the menu on the left side of the options page and the corresponding subpage will appear on the right.

Clicking "Open bookmark manager" will open the bookmark manager.
In the "Search operators" section, you can change the characters (symbols) used as search operators.

Click the "Edit" button to reveal an input box where you can change the search operator. Click the "Save" button or press Enter to save your changes. Click the "Cancel" button or press Esc to cancel your changes.
Any single character other than characters classified as whitespace can be used as a search operator. To ensure that the search string is interpreted correctly, set a character that is not used in tag (= folder) names.
If you want to disable a search operator, leave the input box empty and save it.
The maximum number of items that can be displayed in the dropdown list of the address bar at a time is preset by your browser. If the search results exceed this limit, they will be displayed across multiple pages. This has already been mentioned in the previous chapter. The problem is that sometimes the browser changes this number (hereafter referred to as the "preset number") without prior notice and currently there is no way for FakeTag to detect the change. The purpose of the "Max number of items per page" option is to tell FakeTag this preset number so that it can properly split search results into multiple pages.
First, choose a tag name that returns a relatively large number of search results (10 or more as a guideline) so that they span multiple pages. Look at the "Showing 1-X of Y match(es)" section at the top (hereafter referred to as the "status line"). If the Y value is greater than the X value, then the search results span multiple pages. Note the Y value for later use. Note also that a "![]() " icon appears to the left of each item. Once you have completed this step, press Esc to cancel the search.
" icon appears to the left of each item. Once you have completed this step, press Esc to cancel the search.

In the above case, X is 9 and Y is 11.
Next, set the Y value noted in the previous step as the value for the "Max number of items per page" option.

Then, search again with the same search string as in the first step and note the number of search results with a "![]() " icon (excluding the status line) as "Z".
" icon (excluding the status line) as "Z".

In the above case, Y is 11 and Z is 9.
If the Z value is smaller than the Y value (as it usually should be), then the Z value is the preset number, so set the Z value as the value for the "Max number of items per page" option.
If the Z value is equal to the Y value, or if there are search results without a "![]() " icon, the preset number may be greater than the Z value. So, set the "Max number of items per page" option to a value slightly greater than the current Y value, and try again from the first step (make sure that the search results still span multiple pages after increasing the value).
" icon, the preset number may be greater than the Z value. So, set the "Max number of items per page" option to a value slightly greater than the current Y value, and try again from the first step (make sure that the search results still span multiple pages after increasing the value).
On the "Notes" subpage, you can view and delete unused notes.
For example, if you bookmark the BBC homepage (https://www.bbc.com/) and give it two tags "News" and "U.K.", and a note saying "Read later", then the note will be associated with the URL (rather than the two bookmarks created) and will be stored separately from your bookmarks.
Two bookmarks pointing to the same URL:

┣ [F1: "News"]
┃  ┗ [B1: "BBC"] (=> https://www.bbc.com/)
┗ [F2: "U.K."]
   ┗ [B2: "BBC"] (=> https://www.bbc.com/)

If you look at folders as tags:

[B1/B2: "BBC"] ~ [F1: "News"][F2: "U.K."]

Stored notes:

https://www.bbc.com/ => "Read later"
Then, if you remove the two tags (= delete the two bookmarks) without deleting the note, you will end up in a situation where bookmarks pointing to the URL https://www.bbc.com/ no longer exist, but a note associated with it still exists.
┣ [F1: "News"]
┗ [F2: "U.K."]

Stored notes:

https://www.bbc.com/ => "Reat later"
Notes like this are called "unused notes".

Select the notes you want to delete from the list and click the "Delete selected notes" button to delete them. Click the "![]() " icon to select all notes. Click the "
" icon to select all notes. Click the "![]() " icon to deselect all notes.
" icon to deselect all notes.
This chapter describes the bookmark manager, a tool that allows you to search for bookmarks by tags, perform bulk operations on search results, and so on.
Click the "puzzle piece" icon on the toolbar to display a list of installed extensions, and click the "⋮" icon to display a menu for performing operations related to FakeTag. If you have the "![]() " icon on the toolbar, right-clicking on it will display the same menu. Then, select "Open bookmark manager" from the menu to open the bookmark manager.
" icon on the toolbar, right-clicking on it will display the same menu. Then, select "Open bookmark manager" from the menu to open the bookmark manager.

You can set a keyboard shortcut to open the bookmark manager on the extensions management page (under "Open bookmark manager").

The extensions management page(chrome://extensions/shortcuts)
You can also bookmark the URL of the bookmark manager and store it in an easy-to-access folder (for example, the "Bookmarks bar" folder).
The bookmark manager consists of three parts: the tag selector on the left, the search results view that takes up most of the right side, and the bulk operations bar along the top right of the page.

When you select tags using the tag selector, bookmarks with those tags will be displayed in the search results view on the right.
You can select tags using the search box or the tag list, as described in the previous chapter.
Click the "Clear" button or press Enter with the search box empty to deselect all tags. Press Shift+Enter with the search box empty to deselect the most recently selected tag (usually the right-most tag).
When you click the label part of a selected tag, the display area of the tag list will scroll so that the part corresponding to that tag becomes visible.
When multiple tags are selected, they are treated differently depending on the search mode. If the search mode is AND, bookmarks with all selected tags will be matched. If the search mode is OR, bookmarks with at least one selected tag will be matched. Changing the search mode will reset the current search criteria.
When you select a tag with the NOT option enabled (checked), it will match bookmarks without that tag. Note that a negated tag cannot be used alone, but must be combined with a non-negated tag. Note also that the NOT option is only available when the search mode is AND.

The name of a negated tag is prefixed with "¬".
The bookmark manager's tag list has some additional features that allow you to perform searches that are not possible with normal tags.
Special tags are virtual tags used to search for bookmarks that meet certain criteria. Unlike normal tags, special tags do not have corresponding folders with the same name.
The "Special tags" section can be opened or closed by clicking the "triangle" icon to the right of the label.
As explained later, bookmarks displayed in the search results view can be selected using checkboxes. This selection is maintained even if the search criteria are changed. Use the "Selected bookmarks" tag to display the currently selected bookmarks. The number next to the tag name indicates the number of the currently selected bookmarks. Click the "![]() " icon to deselect all the selected bookmarks.
" icon to deselect all the selected bookmarks.
Use the "Multi-tagged bookmarks" tag to display bookmarks with multiple tags.
As the figure below illustrates, adding multiple tags and creating duplicate bookmarks are the same thing, so the "Multi-tagged bookmarks" tag can also be used to remove unneeded duplicate bookmarks.
Two bookmarks pointing to the same URL:

┣ [F1: "News"]
┃  ┗ [B1: "BBC"] (=> https://www.bbc.com/)
┗ [F2: "U.K."]
   ┗ [B2: "BBC"] (=> https://www.bbc.com/)

If you look at folders as tags:

[B1/B2: "BBC"] ~ [F1: "News"][F2: "U.K."]
A "multi-named bookmark" refers to a "compound bookmark" that is composed of bookmarks that point to the same URL but with different names, as shown in the figure below. Use the "Multi-named bookmarks" tag to display such bookmarks.
Two bookmarks pointing to the same URL:

┣ [F1: "News"]
┃  ┗ [B1: "British Broadcasting Corporation"]
┃                (=> https://www.bbc.com/)
┗ [F2: "U.K."]
   ┗ [B2: "BBC"] (=> https://www.bbc.com/)

If you look at folders as tags:

[B1/B2: "British Broadcasting Coporation/"BBC"]
                        ~ [F1: "News"][F2: "U.K."]
Use the "Annotated bookmarks" tag to display bookmarks with a note.
You can also use this tag to check how many notes you have currently: select the "Annotated bookmarks" tag, select all the bookmarks displayed, and look at the label of the "Selected bookmarks" tag mentioned above.
A temporary tag is a virtual tag used to temporarily save the currently selected bookmarks with a name for later use (see the section 3.2.3 to learn how to create a temporary tag). As shown in the example below, temporary tags allow you to combine AND and OR searches.
Step 1: [China] OR [Japan] OR [Korea] => [Temp: "CJK"]
Step 2: [Animation] OR [Comics] OR [Games] => [Temp: "ACG"]
Step 3: [Temp: "CJK"] AND [Temp: "ACG"]
Once you create a temporary tag, its name will be added to the "Temporary tags" section. Select it to display the saved bookmarks associated with it. Click the "![]() " icon to delete it.
" icon to delete it.
Tags (= folders) in the "Normal tags" section can be deleted by clicking the "![]() " icon. However, "Bookmarks bar" and "Other bookmarks" cannot be deleted. Also, selected tags, tags in use (= non-empty folders), and tags that have subtags cannot be deleted.
" icon. However, "Bookmarks bar" and "Other bookmarks" cannot be deleted. Also, selected tags, tags in use (= non-empty folders), and tags that have subtags cannot be deleted.

The search result view consists of three columns: the "selector" column, the "Name/Note/URL" column, and the "Tags" column.
You can select a bookmark by clicking anywhere in the selector column (including the checkbox itself). As mentioned earlier, this selection is maintained even if the search criteria are changed.
Click the "![]() " icon at the top to select all bookmarks currently displayed. Click the "
" icon at the top to select all bookmarks currently displayed. Click the "![]() " icon to deselect them.
" icon to deselect them.
The "Name/Note/URL" column displays the bookmark's name, note, and URL.
Click the "![]() " icon to edit the bookmark. Click the URL or the "
" icon to edit the bookmark. Click the URL or the "![]() " icon to open the webpage pointed to by the bookmark. Click the "
" icon to open the webpage pointed to by the bookmark. Click the "![]() " icon to remove all tags from the boomark in one step (if the bookmark has a note, it will be deleted as well).
" icon to remove all tags from the boomark in one step (if the bookmark has a note, it will be deleted as well).
The "Tags" column displays the bookmark's tags. Each tag can be removed separately by clicking the "![]() " icon.
" icon.
When you click the label part of a tag, the display area of the tag list on the left side of the page will scroll so that the part corresponding to that tag becomes visible.

Left half
![]()
Right half
Select an operation type and click the "Perform" button to perform the selected operation on the currently selected bookmarks.
There are four types of bulk operations:
For "Add tag" and "Remove tag", you need to select a tag to add/remove. When you click the "Select" button, a search box will appear, so use it to select one.
As explained earlier, a temporary tag is a virtual tag used to temporarily save the currently selected bookmarks with a name. When you select "Create temporary tag" and click the "Perform" button, a dialog box will appear and ask you to enter a name for the temporary tag you want to create. Once you enter a name, the newly created temporary tag will be added to the "Temporary tags" section of the tag selector.
If there are "hidden" selected bookmarks (= bookmarks that are selected but currently not displayed in the search results view) when you click the "Perform" button, a dialog box will appear to warn you of that. If you want to proceed (note that the hidden selected bookmarks are still subject to the bulk operation you are about to perform), click the "OK" button. If you want to cancel, click the "Cancel" button. If you want to display all the currently selected bookmarks, reset the current search criteria, and select the "Selected bookmarks" tag in the "Special tags" section.
This chapter describes how to search for bookmarks by tags from the address bar.
Enter "#" in the address bar and press Tab to put the address bar into a mode where you can search for bookmarks by tags. Then start typing a tag name and bookmarks with matching tags will be displayed.
When you select a search result, the webpage pointed to by the selected bookmark will open in the current tab. Press Esc to cancel the search.
When performing an address bar search, in addition to tag names, you can use some characters (symbols) that have special functions, called search operators. The characters used as search operators can be changed in the options page.
The maximum number of items that can be displayed in the dropdown list of the address bar at a time is preset by your browser. If the search results exceed this limit, they will be displayed across multiple pages. To view the second page or later, add one or more ">"s after the search string.

tag-name   : 1st page
tag-name>  : 2nd page
tag-name>> : 3rd page
To perform an AND search as described in the previous chapter, join tags with "&".
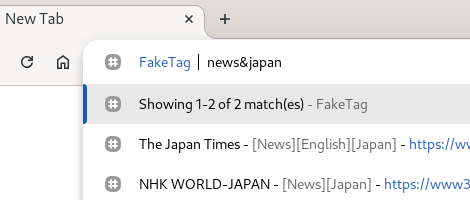
If you add "/" after a tag name, the search results will include not only bookmarks with matching tags, but also bookmarks with subtags (descendant tags) of the matching tags.
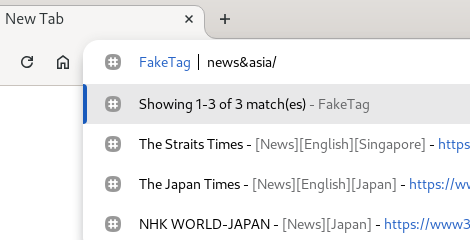
┗ [F1: "Asia"]
   ┣ [F2: "Singapore"]
   ┃  ┗ [B1: "The Straits Times"]
   ┗ [F3: "Japan"]
      ┣ [B2: "The Japan Times"]
      ┗ [B3: "NHK WORLD-JAPAN"]
You can use multiple search operators at the same time as in the example below.
News&Asia/&Economy>>
This translates to "search for bookmarks that have the tags 'News' and 'Asia' (and its subtags) and 'Economy', and display the third page."
